The water pump is easy enough to remove but first the radiator has to be drained, the hoses disconnected and the radiator removed. Next loosen the generator/dynamo adjusting nuts and remove the fan belt. Remove the four bolts holding the fan blades and nose piece to the pump pulley, the four nuts holding the pump to the head and with a little coaxing it should become free.
Stop here!
IF your radiator is already off then Brian Rainbow suggests using bolts instead of the studs originally fitted to attach the pump. Using bolts allows you to remove the pump and also the head without disturbing the radiator!
The four bolts used are all 8x1.0 mm:
Two are Hex head with 30mm thread length; One is a Hex head at 50mm thread length, and the fourth is a Cap Head bolt at 25mm thread length. The Cap Head is fitted where the Offside upper stud had been located. As access with spanner or socket is restricted there, using a hexagonal key or socket extension provides more room for tightening and removal.
Now back to the water pump disassembly.
With the pump off disassembly begins with the removal of the two counter-sunk screws holding the rear plate. Underneath the plate is a donut shaped cast iron spacer held in place by a lip on its outer edge. This is a loose 'free' fit but can get rusted to the pump body making it difficult to remove. The impeller is removed by pushing the tapered pin out of the center boss where it fits on the shaft. Do not be tempted to drive the shaft forward through the impeller to loosen or remove it. Doing so will destroy the carbon seal. The spring and carbon seal are next. The seal is either driven by a pin through the shaft or by a close-fitting rubber seal to the shaft. At least two different methods are known to have been used to drive the carbon seal and once the impeller is removed it will become obvious which you are dealing with. The spring and seal are removed from the shaft. If the carbon gland was driven with a pin in the shaft the pin is then removed. At the front of the pump remove the large circlip in front of the front ball bearing and press the shaft out the front.
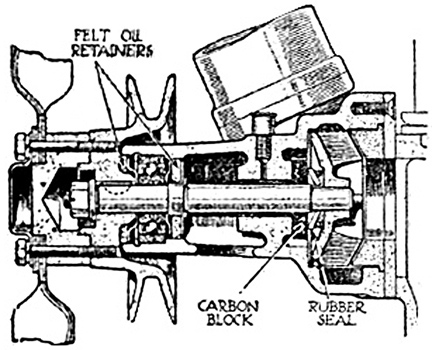
This drawing, by S.E. Porter, appeared in "The Light Car" early in 1939. It shows only two felt washers being used on each side of the front ball bearing and the carbon block with the rubber seal near the impeller.
A spring between the impeller and the block held the carbon against a polished surface on the pump. The rubber seal snugs against the shaft behind the carbon keeping water from leaking along the shaft. It is doubtful that there are any pumps around now days with their original interior bits.
The seals on the original type pumps usually fail because the bronze, oilite bushing becomes worn out allowing the shaft to wobble. When the bushing gets dry (There's an oil cup in the body which often gets plugged by someone using grease instead of oil!) heat build-up and road-dust finding its way in through the large weep hole in the bottom contribute to its failure. The bushing will also fail if the seal goes first allowing liquids to wash away the lubricants between it and the shaft. The original carbon gland seals have been obsolete for years and the TA community is looking for a solution using modern seals.

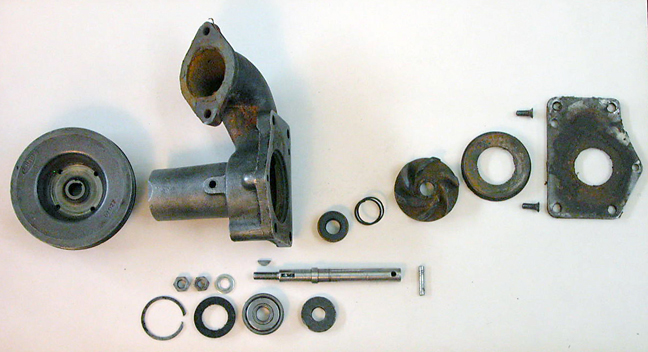
The photo above is a bottom view of the TA Pump showing the major items (except impeller) along side a TC pump. The front bearing is the same as that used in the TC pump and these shafts may be interchangeable. Other bits in the pump are not. The photo below is a top view of the pump with its bits included. The pump pictured here used a sealed ball bearing eliminating the need for some of the original felt washers (seen in the cutaway) and a gland which sealed at the shaft. Some shafts have holes for two pins. One for driving the impeller, the other for driving the carbon seal.
The Water Pump As Used For 30+ Years On TA 2190.
After "rebuilding" my pump a number of times over the course of several years, never fully satisfied, as I was having to re-use old worn-out parts that would only last for a thousand or so miles before the dreaded leak returned, I happened to find a pump advertised that had been 'professionally' rebuilt with 'modern ceramic seals' and I sprang for it. It was expensive but I had no idea how expensive it would eventually become. I bought it while still rebuilding my engine and set my original pump aside intending to have it professionally rebuilt later on. As it happened, things didn't work out quite that way.
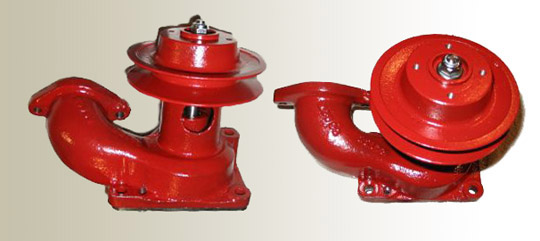
Two Views Of My Rebuilt Pump.
I'm currently running my original (since I've owned the car) water pump, above, which was rebuilt by Cloverleaf Auto Service, Malvern, PA. (I have no affiliation with them) but happy to say that now, after 8,000+ miles all seems good. Unlike the pump disaster a bit further down I hesitate to take it apart just to see what kind of seal and rear bushing they used but it is indeed a bronze bushing and not a dinky little ball bearing. Since these pages were first posted several people in UK have reported satisfaction with rebuilds by E.P. Services of Wolverhampton. And if you provide a core then NTG, UK and From The Frame UP in U.S. both sell rebuilt water pumps.
Below are photos of a TA pump which was modified by East Coast Jaguar - Wilmington, DE.
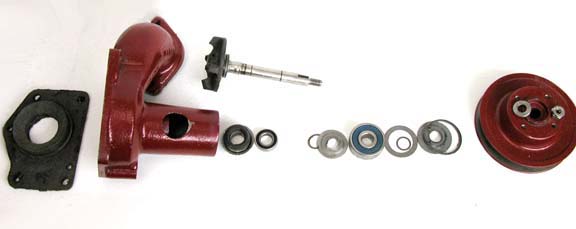
One the left, the End Plate and Donut are still attached by gasket sealant. The Body with Impeller and Shaft above it. Below the Impeller L to R; New Seal and tiny Rear Bearing. Next the Locking Ring and washer for the shaft, Front Bearing, Locating washers and Front Locking Ring. Pulley, washer and Nylock Nut.
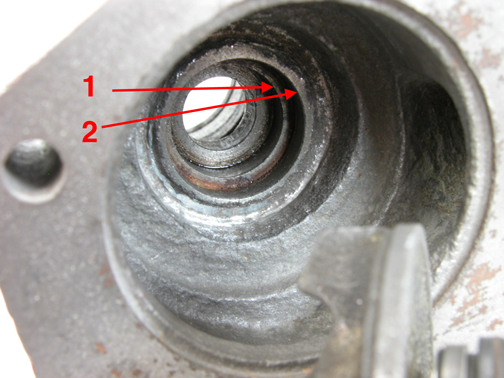
This modification starts with two cuts made into the body. The deepest cut (1) is where rear bearing is seated. Cut (2) is where the cup holding the spring and stationary seal sits. The lip of the cup laps over onto the flat area which had been the polished part of the body that the original carbon gland met.
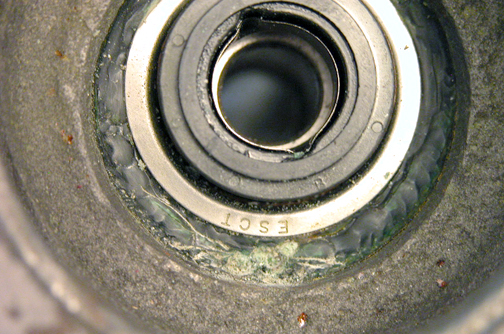
Here the seal (and rear bearing beneath it) are still in place. The cup of the seal is epoxied to the body. This had to be carefully dremmeled away to allow removal of both seal and bearing.

In this photo the epoxy is removed. The lip of the cup must be lifted and broken away from the epoxy before both bearing and seal can be driven out. This was done using drift going in through the nose of the pump.
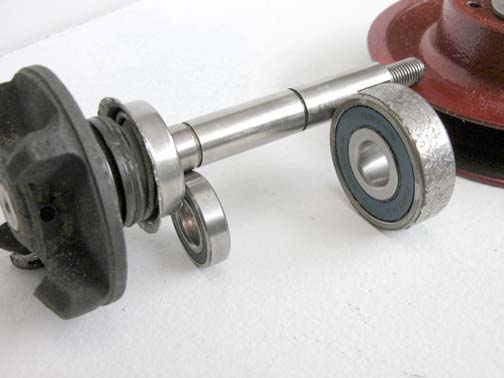
The impeller, seal, rear and front bearings. Note the bearing on the right: In an effort to 'increase' the O.D. an electric arc has been played all around the outer surface. The rear bearing (confirmed by two Master machinists) is too small for this application.
Their method failed. Not once, but TWICE! And after a LOT of wasted money (and time) I finally learned my lesson.
No more dealing with East Coast Jaguar.
Fortunately my local machinist was able to save the housing by fitting a stepped oilite bushing into the rear of the pump housing where the tiny ball bearing had been used. I reassembled the pump using the same ceramic seal, re-epoxyed the base part into the housing then put it on the engine to try it out. After a few hundred miles, checking often for any play in the axial movement of the shaft or drops of coolant leaking from inside, it proved good and I now have confidence in this pump. It’s carried as my spare.
The fiasco with ECJ took place almost 20 years ago and TA owners today are more fortunate. Firms like From The Frame Up and EP Services in UK have had favorable reviews and guarantee their work on MPJG pumps. Both businesses rebuild pumps on a core-return basis. Also check with the Octagon Car Club as they may have some in stock (also core-return).
If you have a modification that *works* for the TA Water Pump I'd like to hear about it! And if you've had a positive experience with a company rebuilding TA water pumps I'd like to hear about that too.
I'm also open to suggestions for repairs to the pump in its original configuration.
Contact: mgta (at) billdavis.org
Thanks to the MG community who've already contributed suggestions.
Contents of this Web Site are copyright © 2020
B Davis.