
Fitting A Modern Spin-on Oil Filter
How about a MODERN FILTER inside
the original Tecalemit housing?
A few years ago, 2017 to be exact, TA Tickford owner, Jim Wulf, (USA) found that a K&N filter (PS-7037) would fit inside the Tecalemit housing and published his findings on the MGExperience forum. These are readily available at most auto-parts stores and online. However the gaskets or O-rings that come in the box with this filter are too large in diameter to fit the Tecalemit housing but The Octagon Car Club do list these (item SBE016B) and there may also be other sources.
As I understand it the K&N filter was designed for oil to flow from outside to inside. This is opposite to the direction flowing through the Tecalemit filtering system and at the time it was believed that this should not be a problem. The 'media' used in these filters (according to K&N's advertising) is said to capture particles as small as 10 microns; far better than the felt contained within a wire-mesh form used for original filtration. So, for anyone concerned with having their MPJG (early or late) look absolutely authentic this would appear to be the perfect solution. And I 'assume' filters manufactured by other companies and compatible with the PS-7037, would also fit. A quick measurement reveals the spring disk in the Tecalemit filter will be compressed roughly 1/4 to 5/16 in. when the K&N filter is used. My old felt filter measured ~5 in. tall whereas the K&N measures ~5 1/4 in. tall.
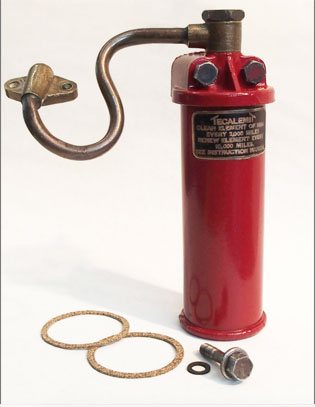
A Tecalemit Unit Ready For Recommissioning!
I should mention here that Tim Parrott, UK, points out that there were two types of Tecalemit filter housings of this same size. I'm talking about just the 'cylinder' that the filter drops into now. Some have thicker walls, without a flange, at the top. The other has somewhat thinner walls but has a flange (the disassembled unit above is the flanged variety). He figures that an O-ring could be used successfully with the flanged top housing but with the straight (thicker walled cylinder) a 'square' edged gasket might be more suited. I cut the two gaskets shown above from cork impregnated neoprene.
Did We Speak Too Soon?
I hadn’t heard of any problems until receiving a the photo below.
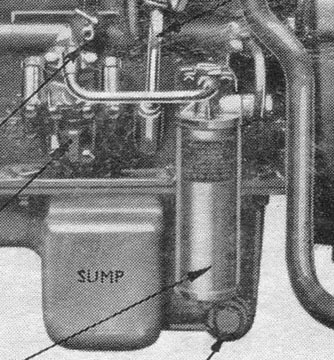
As indicated in the copy above, the K&N filter was designed for oil to flow from outside to inside. This is opposite to the direction flowing through the Tecalemit filtering system and I was told this should not be a problem. However this photo shows that the K&N filter has bulged out to the inside of the housing. Consequently that may indeed be a problem IF it restricts the flow. Just for information, Tim’s custom-built TA oil pump has TC gear cogs giving it a 16% increased flow over conventional TA pumps. Did that attribute to the bulging? Would a TA oil pump with the original flow push the sides out as well? Is there sufficient passage between the folds in the media to allow a safe flow of oil exiting the housing? That’s a lot of unanswered questions. He says he feels comfortable continuing to use these filters. If you are using K&N filters we’d welcome your comments ..especially if you’ve found this bulging!
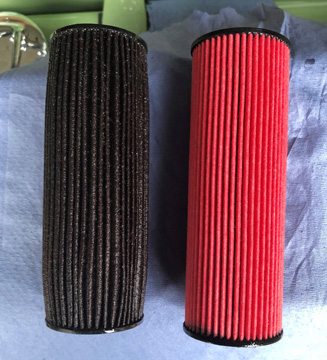
Photo - Tim Parrott
K&N Filter Distortion
Using the K&N filter in our original Tecalemit housing might be an okay idea for concours cars and the K&N filter may also work without a problem if it’s changed often. But till there’s a fool-proof solution I think I’ll keep my spin-on.
Now To Continue With The Spin-On Filter Modification
I'd often thought there must be a better method of filtering the oil than the original felt filter system. One using a spin-on filter like the generic bracket I'd used on a TC would be nice. But one that looked like it belonged there on the block and not just another generic add-on. In discussing filters with Ian Linton, a friend in England, he suggested the mod which our mutual friend Brian Rainbow had told him about -a few of which were already in use in UK. It incorporated a filter bracket from a BMC A series engine -like the engines used in the Austin Metro- and a backing plate. He sent photos of all the bits he'd collected, intending to use it on the engine he was rebuilding and it did have the right look. Brian had had a few spin-on brackets custom made for TAs a few years back but we were both too late for one of those.
I bought a used bracket then was off to the machine shop to have a plate and pipe made up. And then to the hardware store to pick up a couple of 8x1 mm bolts. By adding the thickness of the plate and gaskets behind the bracket the original bolts will be too short. The mounting holes in the filter bracket are slightly closer together than the holes on the TA block where it will fit. So the holes in the bracket will have to be opened out a little to accept the wider spaced bolts. But the metal is soft enough that a round rasp makes quick work there. The plate between the bracket and the block is required to close off an area in the back of the bracket which, if left open, would gush oil onto the engine block before ever getting into the oil gallery. Aside from that it's a shoe-in.
NOTE: This modification will not work on EARLY MPJG engines but scroll down for possible GOOD NEWS!
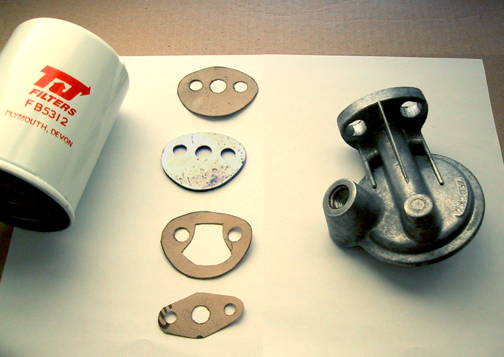
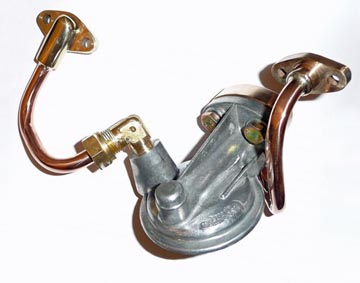
Components for the Austin Metro mod except for the bolts and oil pipe.
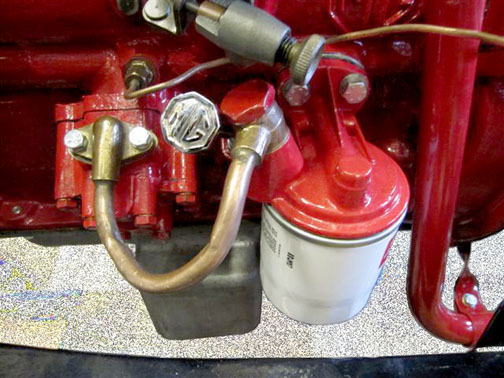
Ian's Filter Installed
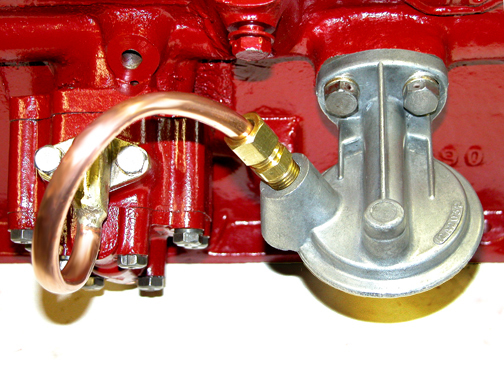
Test Fitting My Bracket
Because the holes in the bracket have to be elongated horizontally the locking washers do not sit fully on solid metal and for insurance I drilled the heads of the two bolts for safety wire. The photo above, taken as I made adjustments to fit the pipe, was made without the spacer in place.
Notice the difference (two photos above) in the way Ian and I attached the oil line into the filter bracket. The banjo fitting he used is more aesthetically pleasing than the compression fittings I used. Good show, Ian!
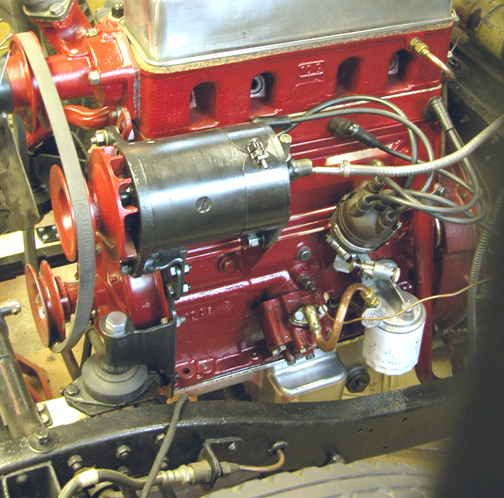
Over 8,000 miles logged to date and I’m very pleased with it.
Thanks for the idea, Ian and Brian.
INSIDE THE FILTER
After rebuilding the engine I began opening the filters to see what they were catching. The first I opened (after approx. 45 minutes without load) had several tiny flecks of shiny metal. But with a number of new and resurfaced parts -lifters, rockers, babbitt, rings, honed cylinder walls, etc.- that was to be expected. I opened the next at 100 miles and the third at 500 miles. The second still had a few flecks but since then the elements have become much cleaner with each filter change. Opening them is probably not necessary now but it's nice to see exactly what is being filtered. And it is nothing like washing out the old felt filter!
Maximum filtration is a must and GOOD spin-on filters will capture particles down to 5 microns.
Spin-On For Early MPJG Engines
Owners of earlier engines have the option of installing a similar type modern filter bracket as those described above.
Early Type Filter Mounting
The earlier engines mounted the Tecalemit filter bracket lower to the block and fed oil into the gallery through a separate pipe whereas the later Tecalemit brackets mounted higher and fed the oil directly into the gallery.
Mick Pay recently listed a spin-on filter conversion for MPJG engines (prior to No.1541) in the classified pages on TTypes.org but may now have sold out. Try contacting him through that publication. Mick also offers spin-on filters for the later MPJG as well as engine torque straps for the TA. Hopefully good news for owners of early engines.
A New Purpose-Built Filter Housing
may be
in the works.
This would eliminate the need for the blanking plate used behind the Metro-type housings in the late type MPJG engines. More on that when I have definite information on availability and source.
Although considering the fact that modern K&N type filters have now been used inside our original Tecalemit housings a purpose-built unit may no longer be a priority item.

Contents of this Web Site are copyright © 2020
B Davis.